Wednesday 14 October 2015

Driving Test Report Form Part 2

Ok so let's look at the next portion of the driving test report form.

I will go through this section by section later but I want to make sure that the driver fault and serious/dangerous is explained thoroughly.
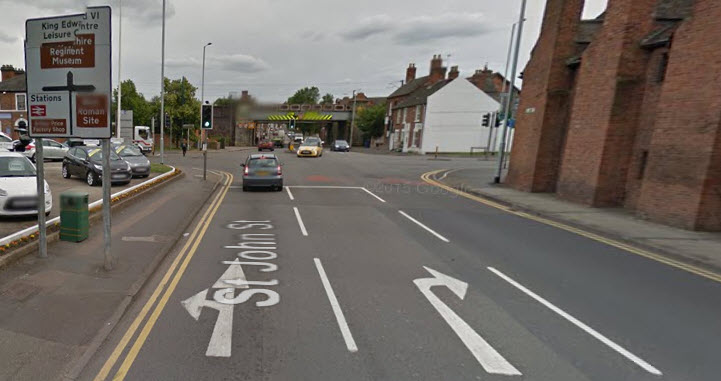
I've highlighted with the green arrow the "cutting corners" part of 21 - Junctions and it can be seen that this (along with all others in this part) can be scored as driver fault, serious or dangerous. Most people will know that when turning right, you are meant to stay on your side of the road and not "cut the corner. Looking at the picture below, you turn roughly following the green arrow and keep off the "Turn after me" patch. 


It would be a generally be a driver fault (minor) as long as there isn't a vehicle approaching following the green arrow. If that vehicle had to slow down it would be a serious (major) fault; if you hit the car it would be a dangerous fault.


A single serious or dangerous fault will, of course, cause a test failure.
Notice that I have given this form 2 driver faults for cutting corners. Another way to fail a driving test is multiples of the same fault. You would get away with 2 but not 5 in one category, the easiest way is to drive properly and get none.


These same principles can be applied to most faults in a driving test. So let's have a look at the other categories in this list.


13. Move Off: You will be asked to do this several times in  your test. You can make mistakes in safety and/or control. Safety will generally mean that you didn't take effective observation ahead, behind and into the blind spot (also behind you). Again these could be driver faults or serious depending on the situation - don't make another road user take evasive action (mostly making them slow).
Stalling an engine in this situation will generally be a driver fault for poor control, it is hard to imagine how this could be a serious fault, since you are already stationary. But I suppose that multiple stalls would be a fairly common fail, especially for a very nervous driver.
14. Use of Mirrors: this is a very common area of failure, especially use of mirrors before change of direction. In fact during test in 2011 there were 130624 candidates who failed in this category. This is an area where examiner's are very critical (quite rightly). An good example would be when turning right at most roundabout, at some point you need to change lanes (right to left) and you need to ensure that the left lane is clear. I will cover roundabouts in a later post as they are the most hazardous junction to negotiate. Use of mirrors before change of speed often happens when the driver is asked to stop on the left but doesn't check that there is a vehicle behind.
That's all for now, but I will examine sections 15-22 in the next post.

Looking for driving lessons in Tamworth or Lichfield, feel free to click on the town.

Thursday 8 October 2015

Driving Test Report Form

During the next few posts, I'd like to explain and give my opinions about the UK driving test. There are certainly several myths about this practical test and I intend to cover those and maybe dispel them in a later post.

This link is to the whole form, which comes in four sections - Driving Test Report Form.

DL25A - Top copy - I believe this is returned to DVDA HQ and filed
DL25B - Test Centre copy, the reverse side is used by the examiner as an aide memoire; more details lower down.
DL25C - Candidate's copy of the report, the reverse side of this has guidance notes and appeals procedure. These notes are meant to explain how the test was scored. This is not easy to understand, but see below.
DL25D - Guidance Notes - given to the candidate as explanatory notes. Also not very easy to comprehend but again see below.

The front side of each copy of the report are substantially the same and I wouldn't worry about the small differences. 

At the end of a driving test (pass or fail) the candidate is given their copies and I think most people never read them or still less understand them. After explaining the result (more details in a later post), the examiner will return to the office and fill in the reverse side of their copy. This is to help them to remember what happened in case of an appeal. Doing 7 tests/day, 5 days per week must be boring and tough to remember if asked a few days later. So they make a few notes about the weather, the car, what the candidate looked like, any other info to jog memory. I guess that they pay more attention to this section when they are expecting an appeal against the decision.

So let's see if I can make some sense of the driving test marking form - the top section is below


Most of this part is self explanatory, but here are a few pointers.

Orange arrow shows the test application reference number, received when a test is booked.
Blue arrow contains the middle 6 digits of the driver's licence number.
Green arrow indicates tick box to be used if car is an automatic.
Red arrow shows tick box for an extended test. Necessary if driver has been banned and is going through the process again. Actually not just returning from a ban but that the incident that caused the ban was VERY serious.
Purple arrows indicate if the test was observed by a supervising examiner and/or instructor. Several years ago, I was asked to sit in on a test which also had a senior examiner checking the test examiner. Four of us in a Fiesta on a rainy day, windows misted up continuously. But well done to Stuart for concentrating with a car full and passing his test.

Here's the left side of the form; one of the most important of the whole form is shown by the two red arrows and the black arrows, but more of that later. Progressing from the top and using the reverse of part 25DLD, the explanations.
1a. Eyesight Test, you are asked to read a number plate at a reasonable distance and if you can't the test will not go ahead.

1b. This wouldn't apply to a car test, used for tractor tests or some other specialist vehicle.

2. Controlled Stop: Around 30% of car tests are asked to do this. The blue arrow 
indicates the box that shows if this occurred.

3. Reverse Left: Around 25% of car tests are asked to do this. The blue arrow indicates the box that shows if this occurred.

4. Reverse Right: Currently this is very rarely done.

5. Reverse Park: Around 50% of car tests are asked to do one of these manoeuvres. the first green arrow again shows if this was done and the second arrow indicates if this was done on a road (parallel park) - box R or if done in a car park (bay park) - box C.

6. Turn in road: Around 25% of car tests are asked to "turn the car around using forward and reverse gears, try not to touch the kerbs". This is their current way of asking you to do a three point turn.

7. Vehicle Checks: These are the so called Show Me Tell Me questions (click link).

Sections 8, 9 and 10 are not used in the car test.

Ok let's go back to the top of the form and discuss the S an D columns, this applies to all relevant sections and explains what the difference is between a driver fault (a minor) and a serious or dangerous fault (a major). As an example, look at item 12 which is control and then section titled parking brake. So a mark or marks in the long horizontal box would show minor(s), but one in the S or D column would be a major i.e. a test fail. 
So let's say that on a test the driver was asked to stop on the left, sounds simple. After stopping, the examiner says "drive off when you are ready" and because the car is on a hill and the driver makes a mistake, the car rolls backwards. If it rolls back a few inches and is recovered by the driver it will be recorded as a driver fault (minor). However if it rolls back a few feet it will be deemed serious or even dangerous especially if there is something or someone behind.

Let's look at the other parts of this form next time and remember if you want to learn to drive quickly in Tamworth or Birmingham click a link and give me a call.


Monday 5 October 2015

Filtered Traffic Lights

So following on from the previous post, I said that we would have a look at filtered traffic lights and as usual there are a few different combinations. Here is the first example:


With this one it is fairly obvious that the left pair of lights control the left 2 lanes and the right 2 control the right turning traffic. So in the current state of this picture the traffic turning right have a red light, whereas those going straight ahead have green. But sometimes it is not quite as clear as this, here is another example (sorry picture isn't perfect).


The lanes shown by the green and blue arrows are controlled by the lights shown by the red arrow. I've inserted a larger version into the picture to help you to see what's going on. So if you are travelling in the "blue" lane, intending to turn right - you must obey the RED light. However as the light sequences progresses you will see a green light in the shape of a right facing arrow. When this happens, you need to turn right, safe in the knowledge that the on-coming traffic will have a red light i.e. you don't wait.


The next picture shows a few of typical filter lights, but there are many types.


The junction in the image below is in Lichfield and has what I call a "part-time filter light". Looking at the above picture, the right hand light has a normal green light plus a right facing arrow green light. This is what is we have in the picture below (shown by white arrow).


As you approach this one, the lights will change (at some point) and traffic going left, ahead and right will have a green (circular) light. So if you are turning right, you will position yourself ready to turn - waiting for on-coming traffic. However after a few seconds the bottom fourth light (green arrow) might come on and you can proceed (as above you can be sure that the on-coming have red light). But filter light doesn't always come on; the sensors try to check if there is any vehicle waiting to turn (hence my name - part-time).

So lots of different filtered traffic light complexes to deal with and if you want to learn to drive in Tamworth or Lichfield please click the appropriate link.


Sunday 4 October 2015

Conventional Traffic Lights i.e. Not Filtered

This post concerns conventional traffic light controlled junctions. I will cover filtered traffic light junction in the next post.

When turning right at most traffic light junctions, you need to position the car waiting to turn right. This can sometimes be difficult to judge, here are a few tips that will help you decide.

Right Turn Only

As you approach the above crossroad, it is fairly clear that the right lane is right turn only. On modern roads this is the most common arrangement, but beware of (generally) older ones where the right lane can also proceed ahead (see below). Also the current convention is to pass passenger side to passenger side, look out for arrows which indicate the opposite (again generally older designed junctions). I learned to drive in the early seventies and the convention was to pass driver's side to driver's side. This is safer since you can see better, but less efficient and to be honest I can't really remember it changing.

So considering this image, when the light is green and you have on-coming traffic - where do you wait? Well the first decision is whether to cross the white STOP line. If I were driving the first vehicle then I'd move forward on green (unless something very unusual is happening). However if I were the second or subsequent vehicle, I would only cross the line if I was sure that I could get the back of my car beyond the pedestrian part of the crossing - see next image.


This is to make sure that I am caught is a bad spot when the lights change. As the lead vehicle progresses further into the junction, you may find that there is enough room to move forward. So where do we wait, even I am impatient :-)

The exact position will vary from crossroad to crossroad but here's my simple rule. I will not go too far forward in case I block someone turning right from opposite and I will not go too far right so I don't make on-going traffic drive around me.


This picture demonstrates this fairly well. The blue car is blocking the lane that the white van is in, but it has to turn right - so fine. The blue car could go a couple of feet further right but not too far - remember you can always creep further forward (but NOT back). The white car is just crossing the pedestrian studs, so that looks fine. But the car that has Google's camera should wait here for now

Right Hand Lane can go ahead as well as right


So remembering that some right hand lanes can go ahead, as well as right - the wait position would not be so far right (so you don't block on-going traffic). But everything else would be the same as the above example.

Very often you can't see the opposite road's arrows (blocked by cars or elevation change). In my experience, if your right lane is right turn only then the one opposite is the same. But as ever with driving, proceed with caution and look for the evidence.

Next post I will have a look at filtered traffic light junctions and if anyone wants to take an intensive course in Leicester or Redditch just click one of the links.