Showing posts with label intensive driving courses. Show all posts

Friday, 11 December 2015

Driving Test Form - Final Part

I can't believe it has been a months since I last updated this learner driver tips blog, but anyway let's finish discussing the last few sections of the driving test form - sections 23 to 27.


23. Positioning - this is divided into two sections:
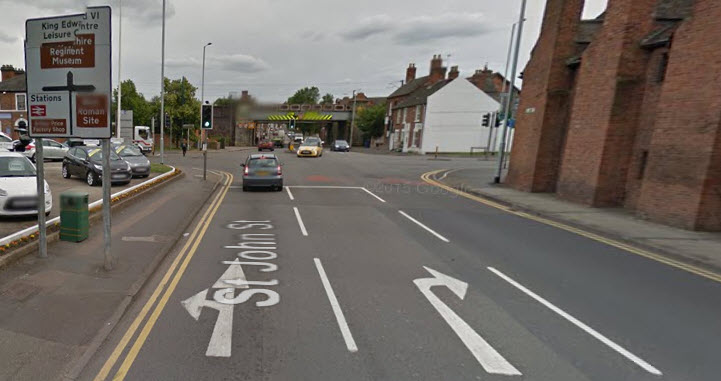
Normal driving position - faults here would include driving too close to the kerb or over the white centre line when you don't need to be. But it would also include cutting across the normal road position when going ahead at a roundabout (without lane markings). It continues to surprise me that almost all roundabouts have lane dividers on approach (green arrow) and almost none have them on the roundabout (red arrow). The roads in the UK are very good but far from perfect. My tip for this one is to aim for the yellow bollard (in front of the car in this pic) and you will be remaining in the left lane.


Lane discipline - This one seems to be exclusively for roundabouts that DO have lane road markings on the roundabout. By definition there will be less test failures for this one, since most roundabouts don't have lane markers. However in my experience a lot of new drivers are not comfortable on these roundabouts because they are generally large, multi lane and confusing to the untrained eye. Maybe I should cover these in a separate post sometime soon.

24. Pedestrian crossings - fairly obvious this one. Failure to give precedence to pedestrians on a pedestrian crossing. Non-compliance with lights at Pedestrian Controlled crossings. The trick here is to make sure that you are alert and if you see a crossing, expect that there may be someone walking towards it. The hazard perception test is very good at promoting this approach - look for a hazard and you will be not be surprised it it develops into a problem.

25. Position for normal stops - during an average driving test, you will be asked to stop on the left several times. You need to choose somewhere that is safe, legal and convenient. A few bad examples are opposite a junction, on double yellow lines and blocking someone's driveway. Although every driving test will include a stop that requires you to move off at an angle by parking reasonably close to a parked vehicle. For this element the examiner by advise you to "not worry about blocking a driveway on this occasion. This is because they want you park in particular position to do the angle start.

26. Awareness and planning -  this can cover many, many situation, in examiner speak this is what they are say "failure to judge what other road users are going to do and react accordingly". A few examples that I recall from driving test:

A coach (not a bus) has stopped on the left and the driver has pulled up close to it and doesn't realise that it is going to be there for a while....

A vehicle is clearly giving away its priority let's say on a roundabout because their exit route is not clear. the driver is unaware of why this is happening and remains stationary, meanwhile the traffic behind is becoming increasingly impatient.....

A high sided heavy goods vehicle is waiting to pass under a low bridge and needs to be in the middle of the road and the driver doesn't know and doesn't react....

Just like all faults in a driving test, I don't mean to suggest that the three above examples would be a test failure. It really depends on the context on the situation, how long it takes for you to work it out, how much a problem that is. This is discussed in an earlier blog post.

26. Ancillary controls - this is to do with windscreen wipers heater controls etc. So an example might be it is pouring with rain and the driver doesn't know how the wipers work or doesn't think they are necessary and the examiner know they are required. Same would go for a misted windscreen or similar.

Well that's it for now and remember if you want to book an intensive course in Lichfield please click the link. The same goes for Leicester

Monday, 5 October 2015

Filtered Traffic Lights

So following on from the previous post, I said that we would have a look at filtered traffic lights and as usual there are a few different combinations. Here is the first example:


With this one it is fairly obvious that the left pair of lights control the left 2 lanes and the right 2 control the right turning traffic. So in the current state of this picture the traffic turning right have a red light, whereas those going straight ahead have green. But sometimes it is not quite as clear as this, here is another example (sorry picture isn't perfect).


The lanes shown by the green and blue arrows are controlled by the lights shown by the red arrow. I've inserted a larger version into the picture to help you to see what's going on. So if you are travelling in the "blue" lane, intending to turn right - you must obey the RED light. However as the light sequences progresses you will see a green light in the shape of a right facing arrow. When this happens, you need to turn right, safe in the knowledge that the on-coming traffic will have a red light i.e. you don't wait.


The next picture shows a few of typical filter lights, but there are many types.


The junction in the image below is in Lichfield and has what I call a "part-time filter light". Looking at the above picture, the right hand light has a normal green light plus a right facing arrow green light. This is what is we have in the picture below (shown by white arrow).


As you approach this one, the lights will change (at some point) and traffic going left, ahead and right will have a green (circular) light. So if you are turning right, you will position yourself ready to turn - waiting for on-coming traffic. However after a few seconds the bottom fourth light (green arrow) might come on and you can proceed (as above you can be sure that the on-coming have red light). But filter light doesn't always come on; the sensors try to check if there is any vehicle waiting to turn (hence my name - part-time).

So lots of different filtered traffic light complexes to deal with and if you want to learn to drive in Tamworth or Lichfield please click the appropriate link.


Sunday, 4 October 2015

Conventional Traffic Lights i.e. Not Filtered

This post concerns conventional traffic light controlled junctions. I will cover filtered traffic light junction in the next post.

When turning right at most traffic light junctions, you need to position the car waiting to turn right. This can sometimes be difficult to judge, here are a few tips that will help you decide.

Right Turn Only

As you approach the above crossroad, it is fairly clear that the right lane is right turn only. On modern roads this is the most common arrangement, but beware of (generally) older ones where the right lane can also proceed ahead (see below). Also the current convention is to pass passenger side to passenger side, look out for arrows which indicate the opposite (again generally older designed junctions). I learned to drive in the early seventies and the convention was to pass driver's side to driver's side. This is safer since you can see better, but less efficient and to be honest I can't really remember it changing.

So considering this image, when the light is green and you have on-coming traffic - where do you wait? Well the first decision is whether to cross the white STOP line. If I were driving the first vehicle then I'd move forward on green (unless something very unusual is happening). However if I were the second or subsequent vehicle, I would only cross the line if I was sure that I could get the back of my car beyond the pedestrian part of the crossing - see next image.


This is to make sure that I am caught is a bad spot when the lights change. As the lead vehicle progresses further into the junction, you may find that there is enough room to move forward. So where do we wait, even I am impatient :-)

The exact position will vary from crossroad to crossroad but here's my simple rule. I will not go too far forward in case I block someone turning right from opposite and I will not go too far right so I don't make on-going traffic drive around me.


This picture demonstrates this fairly well. The blue car is blocking the lane that the white van is in, but it has to turn right - so fine. The blue car could go a couple of feet further right but not too far - remember you can always creep further forward (but NOT back). The white car is just crossing the pedestrian studs, so that looks fine. But the car that has Google's camera should wait here for now

Right Hand Lane can go ahead as well as right


So remembering that some right hand lanes can go ahead, as well as right - the wait position would not be so far right (so you don't block on-going traffic). But everything else would be the same as the above example.

Very often you can't see the opposite road's arrows (blocked by cars or elevation change). In my experience, if your right lane is right turn only then the one opposite is the same. But as ever with driving, proceed with caution and look for the evidence.

Next post I will have a look at filtered traffic light junctions and if anyone wants to take an intensive course in Leicester or Redditch just click one of the links.


Saturday, 19 September 2015

What is the speed limit? Part One

Well I can't believe that it is almost four years since I wrote one of these Learn To Drive Tips. Anyway I hope some of you will enjoy reading and may even learn a little bit.

Question: How do the speed change signs work in the UK? What do I even mean by this? Let's clarify, the images below are all taken from the same road in Lichfield. PS I love Google Street View :-)


In the picture above there are two 40 mph signs; notice that they are fairly large and there's one each on posts on right and left side of the road - opposite each other. This is typically how a change is notified to the driver. So the speed limit will be 40 mph until the next change sign on this road or when you turn off into a different one.


In contrast, the above image shows a 40 mph repeater; this is not a change but a helpful reminder of the current speed limit. Notice that the sign is fairly small and although there is one on the LHS, there isn't one on the right.


Personally I would like to see a few more of these, but there seems to be little consistency with repeaters; some roads have a repeater every 100 yards and sometimes you can drive for miles and not see one. They seem to happen more often when a limit has been changed. So a road that was previously signed as national speed limit and has been changed to 50 or 40 mph, you are much more likely to see repeaters.


The last shot shows a view into a side road and you can clearly see two change signs. So here the speed limit is changing (from 40 mph) to 30 mph. Incidentally if you were to look at the reverse of these signs, you would see two 40 mph signs - showing the change in the other direction.

So how can this help a new driver.

First of all, look out for change signs and repeaters. Nobody will see every sign but if you try, you will see more. Notice that most appear at junctions, either before a junction or just after. Don't forget that they are also painted on the road sometimes, see below.


If you find yourself on a road and you are not sure what the speed limit is, then look for evidence. The best way is to look down a side road and see if there are any change signs. If there are no change signs then the limit should be the same on both roads. However if there are change signs then you certainly know that the limit on the road you are on is different and this will always help to work it out.

Other clues would be:

Are there lampposts? If there are none, then this indicates national speed limit - although some of these roads have a few lampposts to illuminate junctions.
Is it a built up area? Houses close to the road indicate 30 mph, although some could be 20 mph (as above). Footpaths on both sides of the road would also indicate a built up area.

For intensive driving courses, why not check out the website? We now have excellent instructors in many areas, prices are available here.

Monday, 3 January 2011

Is an intensive driving course a good option

OK so you want to pass your driving test as quickly as possible. Are intensive courses a good choice for you?
Let's look at the statistics first The Driving Standards Agency reports that the pass rate for the UK car test generally hovers around 40%. They don't report on intensive courses since they wouldn't know how a particular candidate had been learning. However having done many intensive courses myself, I can report that the pass rate is significantly higher (in 2010 my courses had a 74% success rate). Of course one can take my experience with a pinch of salt...But let's say that is is accepted, then why does it happen? My opinions are that:
  • People who do an intensive course are more motivated, they generally have a particular reason to pass e.g. a job offer. Contract this with a person who has just turned 17 and a family member has paid for a few lessons - not necessarily very motivated.
  • In the usual weekly lessons model, there a degree of "wasted" time where last week's lesson is recapped and re-learned. This doesn't affect an intensive learner so much, since should not have forgotten too much, from an hour earlier (say).
  • It is customary for instructors to teach a learner using the DSA's standard test routes, once the pupil is competent. This is especially useful in an intensive course, at most centres I will be able to teach on all routes in the run up to a test. Because this is done in a short period, the pupil becomes very familiar with the difficult roundabouts, stop junctions etc.

Having passed your test, please, please carry on learning - I've been driving for 40 years and I still learn. Having said that the UK pass rate is relatively low c 40%, the accident rate amongst new drivers is very bad (check out the insurance premiums). So however you choose to learn, remember that it is a process that continues forever.
Pass quickly by taking an intensive driving course.

Wednesday, 15 September 2010

RAMP and MSPSL - secrets for passing test


Following on from yesterday's tip - let's look at how the examiner's are taught. Ok so there's a junction coming up and we are going to turn right - this is what the examiner thinks: RAMP = (check) Road Ahead, (check) Mirror, (eyes on) Pupil and says "at the road ahead please turn right". The examiner then checks if the pupil follows MSPSL. Mirrors - are pupil's eyes looking into internal and right mirrors? Signal - is pupil's finger applying right signal at the correct time? Position - are we steering to just left of centre? Speed - are we slowing down to correct speed for junction, correct gear too? Look - is pupil looking ahead and right? And finally is the pupil's decision a good one i.e. to go or stop?
So every time the examiner says " at the ..... ahead please turn ......" - you should kick off your MSPSL procedure - this is the correct way to deal with ALL hazards anyway and if you apply it correctly, you will have a better than average chance in your test.

More tips soon in the meantime check out my intensive course website

Sunday, 5 September 2010

Top ten reasons for failing the practical driving test

According to the Driving Standards Agency, the current pass rate for the UK driving test is 43%. So it has to be useful to know what most people do wrong.

The top ten reasons for failing the driving test are:

  1. Observation at junctions: Ineffective observation and judgement.
  2. Reverse parking manoeuvre: Ineffective observation or lack of accuracy.
  3. Use of mirrors: Not checking or not acting on information from mirrors.
  4. Reversing around a corner manoeuvre: Ineffective observation or a lack of accuracy.
  5. Incorrect use of signals on driving test: Not cancelling or giving misleading signals.
  6. Moving away safely: Ineffective observation before moving.
  7. Incorrect positioning on the road: At roundabouts or on bends.
  8. Lack of steering control: Steering too early or leaving it too late.
  9. Incorrect positioning to turn right: At junctions and in one way streets.
  10. Inappropriate speed during the test: Travelling too slowly or being hesitant.

Intensive driving courses are the fastest and cheapest way to learn

Thursday, 2 September 2010

Signals to other road users

The Highway Code states that signals are used to warn and inform other road users of our intentions. How many signals can you think of and how often are they used? Most people would say, indicators, brake lights, reversing lights, hazard warning lights - then err err can't remember. Anyway for what it is worth there are 8 and I believe this is the correct ranking based on usage.

1. Car position i.e. parked or holding back; positioned to turn right/left; lane discipline on roundabout, dual carriageway etc.
2. Brake lights
3. Indicators
4. Reversing lights
5. Headlight flash
6. Hazard warning lights
7. Horn
8. Arm signals

So if you think about it we are continuously giving at least one signal at all times, even if we are simply driving down a straight road with no intention of turning off. The car position is an intuitive signal straight from the driver's subconscious.

Ask about the practical test backlog and how we get around it.

Wednesday, 7 July 2010

Daily Tips For Eco Friendly Driving


Smooth driving at a sensible speed is the best way to keep emissions and expenditure to a minimum. Generally speaking, petrol is consumed quicker at low and high speeds, with 50 to 60mph usually being the most fuel-efficient speeds. So, try to plan your route and timing to avoid traffic jams, and remember also that driving over 70mph, as well as being against the law, dramatically increases emissions and consumption. Even driving at 70mph can cost up to 25% more than driving at 50mph. Remember too that both fast acceleration and heavy braking use more fuel.
Book lessons here

Monday, 21 June 2010

Speed humps as a learning aid

New drivers often find it difficult to stay a reasonable distance from the left kerb and instructors will correctly help them by giving them a reference point. Something like "we are about a meter from the kerb now, so tell me where the kerb appears to come into the car?" "Oh its in the middle of the wiper blade", "OK so try to keep it there; this is your normal driving position".
Personally I find that traffic calming speed humps like the one here really help. I get the learner to try to straddle the hump and mostly they are too far to the left, consequently their side of the car bumps up. So next time aim a little to the right; oh! this time neither side of the car raises up. Well done, let's practice that a few more time - excellent you've got that perfectly.
What happens is that the drivers spatial awareness is improved by the physical feedback of the car raising left side or right and they keep looking ahead rather than ahead then to the side.

Hope this post helps you a little, if you want to find out more about our driving lesson summer special offers and teaching methods click a link.